Pages

Tuesday, March 17, 2015

Asp.net Drag item in Listview using XML file

Introduction

This code-sample includes two ListView controls that the user can sort and move and drag items from one controls to another. This sample can be used in many purposes. For example, you can create an application of online shopping and the customer will have better feelings with your application.

Here is the code

1. Create a C# "ASP.NET Empty Web Application" in Visual Studio 2010 or Visual Web Developer 2010.
2. Add a web form named "Default.aspx" in root directory.
3. Create a "XmlFile" folder and add two XML files in it, "ListView1.xml" and "ListView2.xml".
4. Filling some elements in XML file, like code-sample and these data will bind to the ListView controls.
<?xml version="1.0" encoding="utf-8" ?>
<root>
  <data open="1">element 1</data>
  <data open="1">element 2</data>
  <data open="1">element 3</data>
  <data open="1">element 4</data>
  <data open="1">element 5</data>
  <data open="1">element 6</data>
  <data open="1">element 7</data>
</root>
 
Import some JQuery Javascript library in <head> tag like this:
 
<link href="JQuery/jquery-ui.css" rel="stylesheet" type="text/css" />
<script src="JQuery/jquery-1.4.4.min.js" type="text/javascript"></script>
<script src="JQuery/jquery-ui.min.js" type="text/javascript"></script>

Add JQuery functions in Default.aspx page, these two JQuery functions use to dragging and dropping items to a ListView control :
 
<script type="text/javascript">
        $(function () {
            $("#sortable1, #sortable2").sortable({
                connectWith: ".connectedSortable"
            }).disableSelection();
        });

        $(document).ready(function () {
            $("li").dblclick(function () {
                $(this).closest('li').remove();
            });
        });
</script>
 
Write C# code in Default.aspx.cs page to bind XML files data:
 
// Bind two xml data file to ListView control, actually you can change 
the "open" property to "0",
// In that way, it will not display in ListView control.
     XmlDocument xmlDocument = new XmlDocument();
     using (DataTable tabListView1 = new DataTable())
      {
        tabListView1.Columns.Add("value", Type.GetType("System.String"));
        xmlDocument.Load
        (AppDomain.CurrentDomain.BaseDirectory + "/XmlFile/ListView1.xml");
        XmlNodeList xmlNodeList = xmlDocument.SelectNodes
        ("root/data[@open='1']");
        foreach (XmlNode xmlNode in xmlNodeList)
                {
                    DataRow dr = tabListView1.NewRow();
                    dr["value"] = xmlNode.InnerText;
                    tabListView1.Rows.Add(dr);
                }
                ListView1.DataSource = tabListView1;
                ListView1.DataBind();
            }

       XmlDocument xmlDocument2 = new XmlDocument();
       using (DataTable tabListView2 = new DataTable())
         {
           tabListView2.Columns.Add("value2", Type.GetType("System.String"));
           xmlDocument2.Load
           (AppDomain.CurrentDomain.BaseDirectory + "/XmlFile/ListView2.xml");
           XmlNodeList xmlNodeList2 = xmlDocument2.SelectNodes
          ("root/data[@open='1']");
           foreach (XmlNode xmlNode in xmlNodeList2)
                {
                    DataRow dr = tabListView2.NewRow();
                    dr["value2"] = xmlNode.InnerText;
                    tabListView2.Rows.Add(dr);
                }
                ListView2.DataSource = tabListView2;
                ListView2.DataBind();
            }

Build the application and you can debug it.

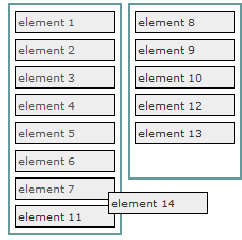
Please drag items from a ListView control to another, you can also sort items by dragging items to the right position.

Double-click one item to drop it from the ListView control.

Thursday, March 12, 2015

Google Maps with Custom Styles and Custom Pin

Google Maps is one of the best services. It is free tool that allows you to easily implement information, rich maps on your website.
In this article we will see how to use the Google Map API and Google Maps with custom styles as in the API that controls the map styles and a custom pin.

Google Map Library
First put Google Maps JavaScript library into the <head> tag.

<script
src="https://maps.googleapis.com/maps/api/js?v=3.exp&sensor=false"></script>

Google Map Components
There are the following three components to the style the Google Maps map.
  • The featureType
  • The elementType
  • The stylers
featuretype is used to select geographical object, like road, the water, the parks and so on. we use some of the object in this article.
  1. Administrative
  2. landscape
  3. poi
  4. poi.government
  5. road
  6. road.highway
  7. transit
  8. water
For more details, just follow the API reference: Google Maps feature type specification.

elementtype targets the element that is part of the geographical object.

stylers is an array of properties to adjust the object colors and its visibility.

Here is the Code :
We need to add a <div> element and assign it an id.

<div id="pankil"></div>

The Styles in Google Maps are declared with a JavaScript object.
 
window.onload = function () {
    var styles = [
       //add the scripts here
    ]
};

we can add the script for water in styles object.

window.onload = function () {
    var styles = [
    {
     "featureType": "water",
     "elementType": "all",
     "stylers":
      [
         {
            "color": "#b2b2b2" 
         },
     {
    "visibility":"on"
    }]
    }
  ];

we can add the script for the road into the existing styles object.

window.onload = function () {
     var styles = [
     {
         "featureType": "water",
         "elementType": "all",
         "stylers":
              [
                 {
                  "color": "#b2b2b2"
                 },

               {
                 "visibility":"on"
               }
              ]
    },
    {
        "featureType": "road",
        "elementType": "all",
        "stylers":
            [
               {
                "saturation": -100
               },
             { 
               "lightness":45
             }
            ]
     }
];
We can even add the others scripts into an existing styles object.
Also make a custom pin in the script.

var myMarker1 = new google.maps.Marker({position: new
google.maps.LatLng(23.0247119, 72.5714988), map: map, icon: 'local
path of the icon image' });

Then, display the map to the <div> container with the following functions.

window.onload = function () {
       var styles = [
             //add the scripts here
       ]
       };
       var options = {
       mapTypeControlOptions: {
       mapTypeIds:['Styled']
       },
      center: new google.maps.LatLng(23.0167119,72.5728762),
      zoom: 12,
      disableDefaultUI: true, 
      mapTypeId:'Styled'
    };
var div = document.getElementById('pankil');
var map = new google.maps.Map(div, options);
var styledMapType = new google.maps.StyledMapType(styles, { name: 'Styled'});

map.mapTypes.set('Styled', styledMapType);

var myMarker1 =
new google.maps.Marker({position: new google.maps.LatLng(23.0247119,
72.5714988), map: map, icon: 'p.png' });
}

At the end, the map should be appended on the Page.
Google Custom Map 
Download Full Source